
- If you live in South Texas, you'll spend $200+ for repairs if you don't winterize
- The above-ground sprinkler system PVB is designed to break and cost you money
- How to prevent damage during Texas hard freeze
- My sprinkler PVB still broke, now what?
- Bottom pieces - check valve assembly repair kit
- Top pieces - bonnet and poppet repair kit
- Fixing the PVB with these parts easily
- The plastic pieces look good but the soft rubber gaskets are warped and ripped
- The brass valve were the water supply comes in cracked
- The bleeder valve test cock port is slowly leaking water
- Replacing the whole PVB because the brass body cracked
- The water shutoff valve handles are rusted and hard to turn
UPDATE: If you have a damaged sprinkler PVB that is leaking water scroll to the bottom section of this guide for cost-effective options to fix. Share this guide with your friends because each person’s fix may be different depending on what they identify is damaged.
If you live in South Texas, you’ll spend $200+ for repairs if you don’t winterize #
If the temperature is going to drop to 30 or below, expect sprinkler system damage unless you do the following. Simply wrapping your pipes with a little bit of pink insulation, towels, and covering it in a grocery bag/garbage bag with duct tape may be okay in the 30’s. Even using an insulated waterproof bag designed for this will work in those temperatures. If it’s only going that low overnight and the next day it will warm-up, you will most likely be fine with this basic step.
But for a hard freeze even where multiple days and nights are freezing like in the February 2021 winter storm that hit Texas, you must do more to winterize or you will be paying a lot of money for repairs. How the local TV news channels in Texas tell you to winterize will not cut it in a hard freeze and you will experience damage to your sprinkler PVB. As the climate continues to change these types of extreme weather events will happen more often.

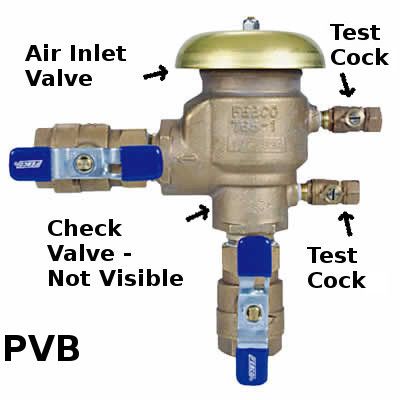
The above-ground sprinkler system PVB is designed to break and cost you money #

PVB (pressure vacuum breaker) which is also known as a backflow preventer. Some people call it a sprinkler bell because it has a bell looking part on top. It is above ground and it holds water back from going back into the street water main using air vacuum sucked in from beneath the bell portion. It hold water back. Think about that. There will always be some water inside of it. When water freezes, it expands. That ice will break the brass PVB by cracking it or break the plastic pieces inside of it easily. It’s called thermal expansion.
There are only 2 ways to prevent PVB damage: get every bit of water out OR add heat to prevent the water from turning to ice. Insulation is useless in a hard freeze situation. You may see a 1-degree temperature difference between the air and the pipe under the insulation if even that. DO NOT fool yourself into thinking wrapping your pipes alone is going to help prevent damage in a hard freeze situation.
Our systems in South Texas cannot be winterized like in the north parts of the US where it snows and freezes annually. Our Texas sprinkler systems don’t have as many drain ports or blow-out valves to hook up to in order to get water fully out. This is why you often see sprinkler PVBs and exposed pipes not even insulated. They know it’s useless to insulate. The only way to prevent cracking is to get all the water out fully using the multiple drain points and blowers that are hooked up and blows air through the whole system forcing all water out through the sprinkler heads. Some people in Texas don’t even have an in-ground shutoff valve for the water supply to just the sprinkler system. This is all bad in a hard freeze situation and will cost you a lot of money.
This means by design, the PVB and sprinkler system design in Texas is going to break. It wasn’t setup for hard freeze temperatures like in the north. So you must be extra vigilant and take steps to prevent this damage as best as you can even with a sprinkler system that is designed to break in this kind of weather. It’s not foolproof even doing all these steps will prevent damage but you have a much better chance. What you see on the local news in Texas is only partly right. If you follow those instructions showing you how to drain using the test cock ports (2 bleeder ports on the side of the PVB) with a flathead screwdriver, you will still have damage to your sprinkler system’s PVB.
Usually, if you don’t drain the PVB or shutoff the water supply the whole brass casing will crack when water inside expands due to freeze. The metal bell looking part covering the air inlet valve pops off and water shoots out the top until a neighbor tells you your lawn is flooding. Sometimes the brass doesn’t crack thankfully but the inside plastic pieces are broken and are less expensive to fix. Usually, it’s the bonnet and poppet that break and need to be replaced. To fully replace a cracked brass PVB can be $200+. The bonnet and poppet are usually around $50. It’s very easy to take apart a PVB and replace parts inside yourself but replacing cracked PVB usually requires a sprinkler repair person, landscaper, or plumber. PVBs come in different sizes so if you are not replacing it with the exact same model, the professional will make adjustments to make sure it fits and works correctly.
And if you do drain it using the 2 bleed valves (test cock ports) that the local news shows you and shutoff the water supply, you will still have water inside near the supply valve going to the PVB which will break the plastic pieces inside the PVB as that water expands. Usually, it’s the bottom half of the PVB and inside it is the plastic check valve assembly that breaks. To replace the plastic pieces inside the PVB can be $50+ per section so you can around be anywhere from $50 to $150 total just to get the repair parts. PVB manufacturers design for failure and hope that if you don’t winterize properly only the cheaper plastic pieces break for you and you can replace them yourself. This is cheaper than replacing the entire PVB.
How to prevent damage during Texas hard freeze #
STEP 1 – in-ground valves #
You need to shut off water to the sprinkler system entirely to do this right. Find the in-ground sprinkler shutoff valve and shut off the lever to prevent water from reaching your above-ground pipes and PVB. It is called an ICV (irrigation control valve). This is usually near the street close the black water main box that has your main water valve and meter in it. Look for the meter box and main valve which near the street by your sidewalk:

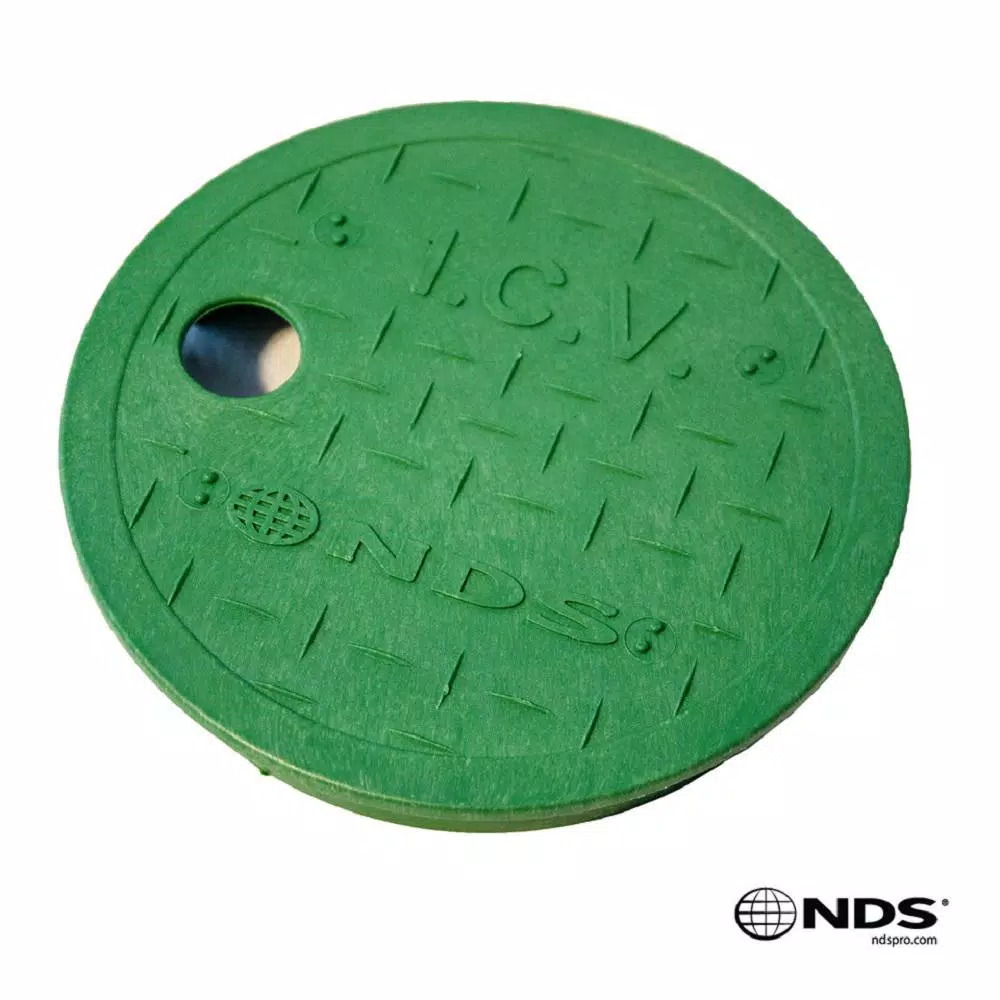
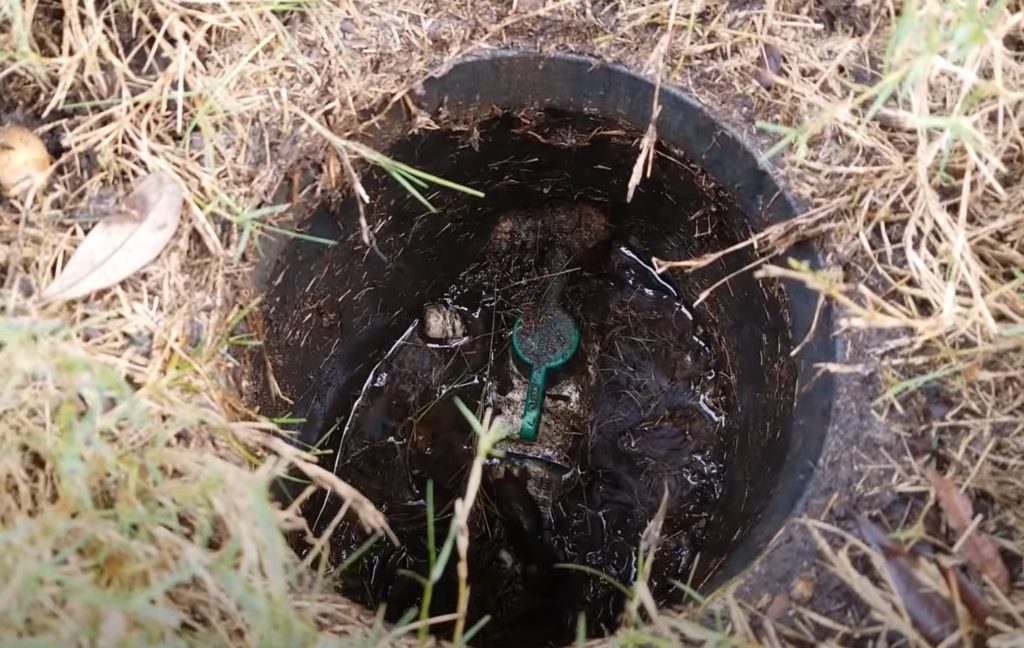
Now from here, look for the ICV valve box in the ground. It can be somewhere along the way in your lawn near the sidewalk all the way up to the above-ground PVB but is usually in a straight line somewhere from the meter box above all the way to your PVB on the side of the house. Many good home builders will put it in a green irrigation control box like this near the PVB or by the sidewalk. It may be overgrown with grass so pull up any grass around it to get it open. Sometimes frogs like to live in there so don’t be shocked when lifting the cover. You can take a screwdriver or shovel and poke around in your grass to help you find it:

If you look closely at the green cover it will say I.C.V. which stands for irrigation control valve on it if your home builder did it right:
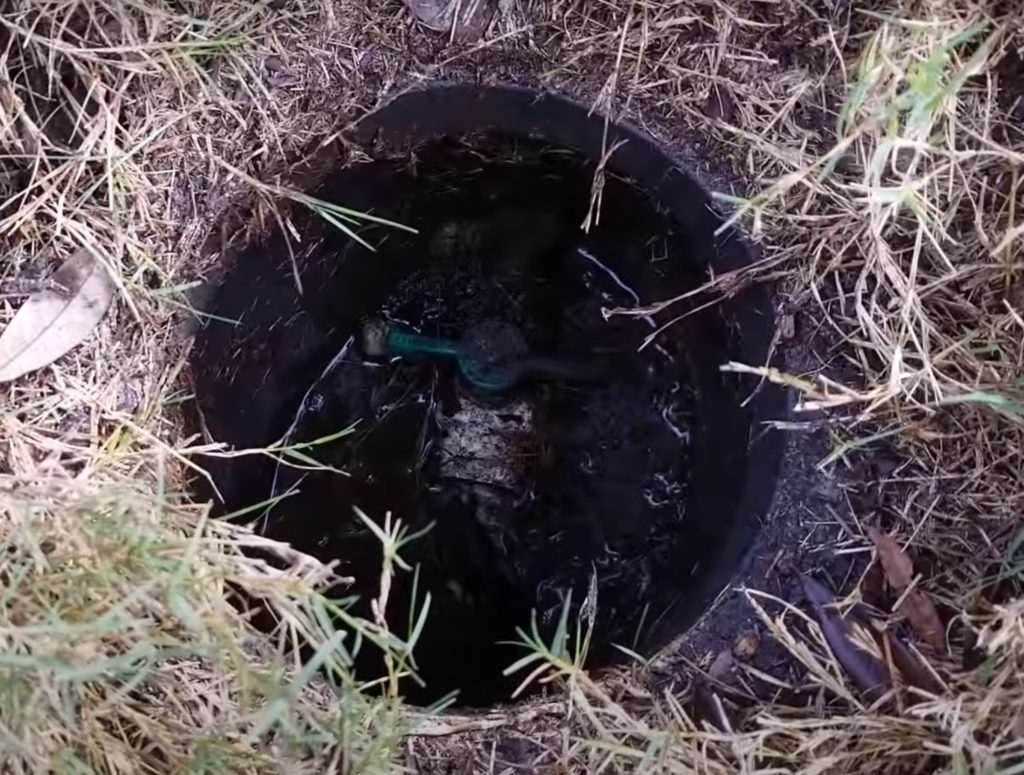
Once you lift this cover inside will be a red or green shutoff valve like this usually. Sometimes it may be located in a bigger green box in the ground and grouped with a bunch of sprinkler solenoids for your sprinkler zones too if your sprinkler installer was lazy so don’t worry if you see a bunch of wires and posts in there. Look for the valve in there as there will only be one valve like this for your whole sprinkler system:
Turn the valve 90 degrees fully so it is perpendicular to the pipe. Now you have shutoff the water to your sprinkler system only. You did not open up your water main box and shut off water to your whole house. This way your house continues to have water and only your sprinkler system has its water shut off. If you do not have a sprinklre shutoff valve in-ground, get one installed so you can do this:
An ICV has been required by the Texas Commission on Environmental Quality (TCEQ) since at least January 1, 2009. In the “SUBCHAPTER F: STANDARDS FOR DESIGNING, INSTALLING, AND MAINTAINING LANDSCAPE IRRIGATION SYSTEMS” document there is Chapter “§344.61. Minimum Standards for the Design of the Irrigation Plan.” – https://www.tceq.texas.gov/assets/public/legal/rules/rules/pdflib/344f.pdf. On page 3 it states:
(k) Isolation valve. All new irrigation systems must include an isolation valve between the water meter and the backflow prevention device.
Some of the not-so-good home builders in Texas will just bury it without a box or not even install a shutoff valve period thinking you will never need it. It’s a cost-cutting measure and you should pursue your home builder to install one if it is missing if your home is 2009 or newer. It is a state requirement in Texas that all newly built homes since 2009 must have an isolation valve installed in an ICV box. You can call the TCEQ Headquarters Main Switchboard and ask for help if your builder refuses to install one. If your builder won’t do it then you can get a sprinkler repair company to install one for you if you don’t have one or can’t find where your builder has hidden it if they claim they did it for you. Shutting the water off in-ground before the above-ground pipes is the part most people in the south don’t do and it causes damage to the PVB internals because there will still be water inside the above-ground pipes and valve near the PVB which will cause the PVB internals to freeze and break.
If it’s an emergency and you don’t have an in-ground valve and expect temps to quickly drop, then capture as much water as you need in your tub and in collapsible water storage containers. I love these because you can keep them folded up in the pantry when not in use and they take up no space at all. When an emergency happens pull them out and fill them with water (click the picture below for details):

Then go out the black meter box and use a crescent wrench on the valve in there to turn off the water for your house completely. Then go around to your hose bibs (hose faucets on the sides of your house) and drain water out of them. Then go into your house and open each sink in the house and drain water. Then drain the sprinkler PVB in step 2 below. This will get water fully out of your house pipes including the PVB and above-ground water supply pipe as well as the pipes in your walls and attic that may freeze if you lose electricity/heat in your home. This helps prevent pipes even in your home from bursting in extreme freeze situations. When the freeze is over, have an ICV valve installed so you don’t have to shut off water to your whole house next time.
STEP 2 – the PVB and above-ground pipes #
Now the part the local news will show you. You need to drain the PVB. And you need to drain the supply pipe above-ground which they don’t cover.
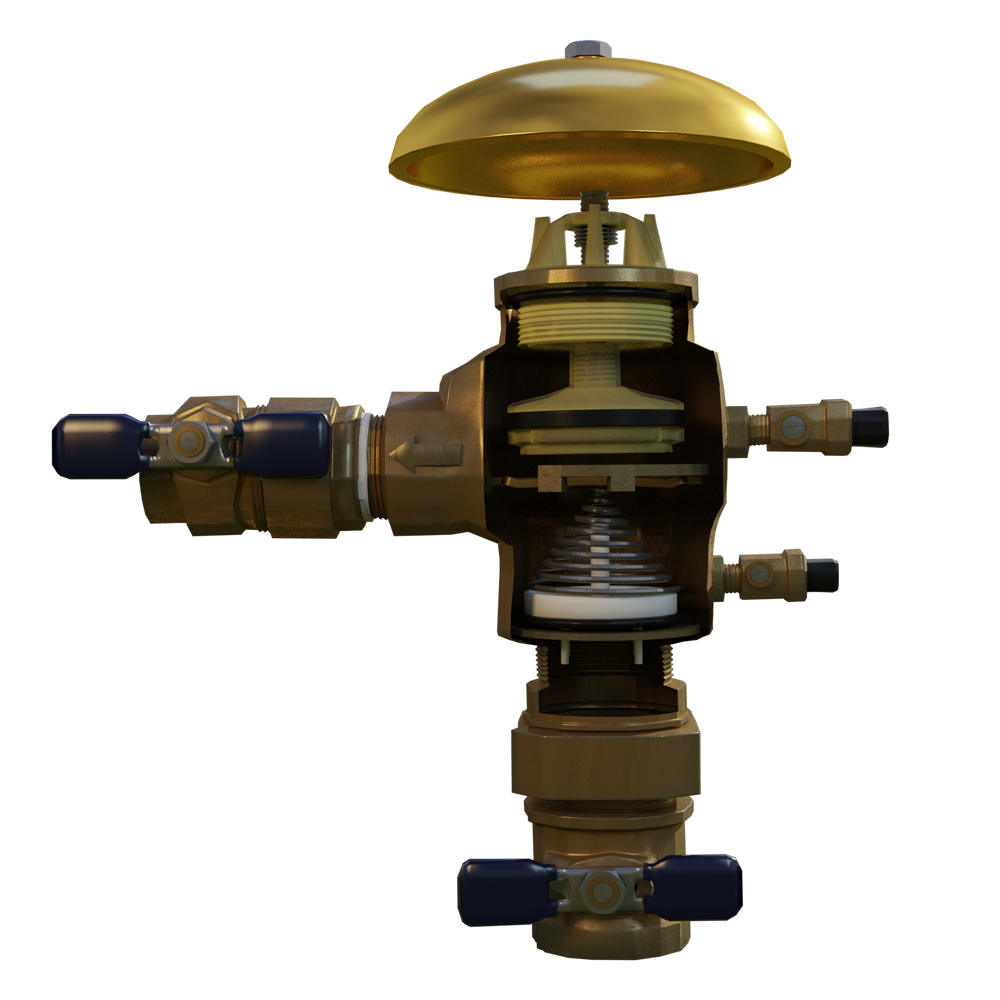
Your system is still pressurized at this point even though you turned off the water to it. There is water in the ground from the valve you turned off all the way to the PVB right now. Here is the PVB diagram again on how the insides look. Notice how it has a top section and bottom section. The bell portion brings air in and the bottom portion is what opens up and lets water into the PVB. And it has 2 test cock ports (bleeder valves) on the right side for each of these 2 sections. You need to bleed pressurized water out from both these ports.
These are not screws and don’t come out. Just use a flat head screwdriver and turn the line in the screw so it’s left to right instead of up and down. Water will shoot out. Then return the valve to half way open at a 45 degree angle (DO NOT leave it fully open or closed). Do the top port first:
Now do the bottom port the same way and return it to half way open at a 45 degree angle (DO NOT leave it fully open or closed):
Now turn the bottom valve to a 45-degree angle. The main water valve and downstream valve are usually not stainless steel in Texas to cut costs so they will rust over. Spray it with PB Blaster or WD-40 to be able to turn the valves. DO NOT completely turnoff this valve or water will get trapped, expand, and break the bottom valve right below the PVB when it freezes. You want the water to drain or evaporate out the ports before it begins to freeze and move the trapped column of water out instead of getting stuck when it freezes and expands to ice. You want no water sitting enclosed with nowhere to go because it will expand and break the brass. This is what the local news often misses because people in South Texas are not used to hard freeze that can last multiple days. You can watch this video to see how to drain your PVB and set the valve angles properly:
In the north, sprinkler systems have additional drain ports and blowout valves below this valve to fully get water out of anything above ground. Unfortunately in the south, we don’t have this so this is the best we can do. But I do have an optional step using a Shopvac to suck the water out I will go over further below. In the northern parts of the US they don’t even use insulation on their pipes because they know it’s useless for their winters and can get all the water out before it snows.
Example of a blow out port you can hook up an air compressor to if you are curious. You cutoff the PVB but turning off the valves and push air through the sprinkler system so all water gets shot out of the sprinkler nozzles in all of your sprinkler zones as you run each zone:

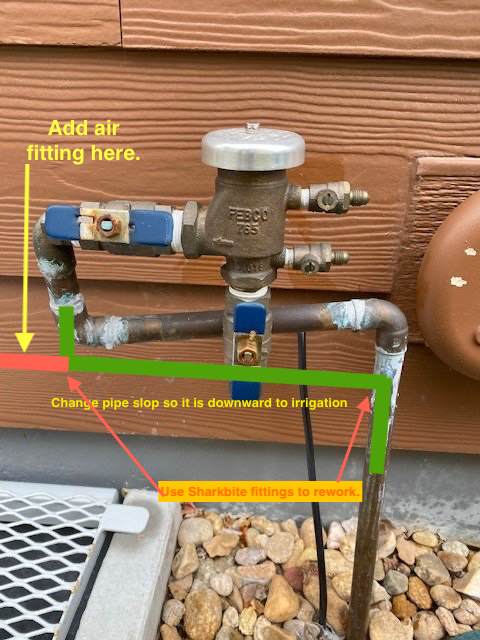
If temperatures in South Texas do start to become worse in coming years you can add a blow-out port to your existing sprinkler system. A plumber or sprinkler repair person can cut into the pipe and add a port since it’s PVC. In the north they use metal pipes and either refit the pipes or use a Sharkbite fitting to add the port:
Example of drain port marked at C to fully get water out of the supply line (in this case water supply coming from inside home from the basement). Again notice no insulation is used on pipes since it’s useless. If you can fully drain the PVB and supply line of water then you just have some metal on your side of the house and it won’t break when it freezes:

As an example of how areas up north winterize by draining all points and blowing water out, you can watch this video. Texas sprinkler systems are not installed with blow-out ports like this unfortunately so we cannot fully get water out easily like they are doing here:
STEP 3 – vacuuming the water #
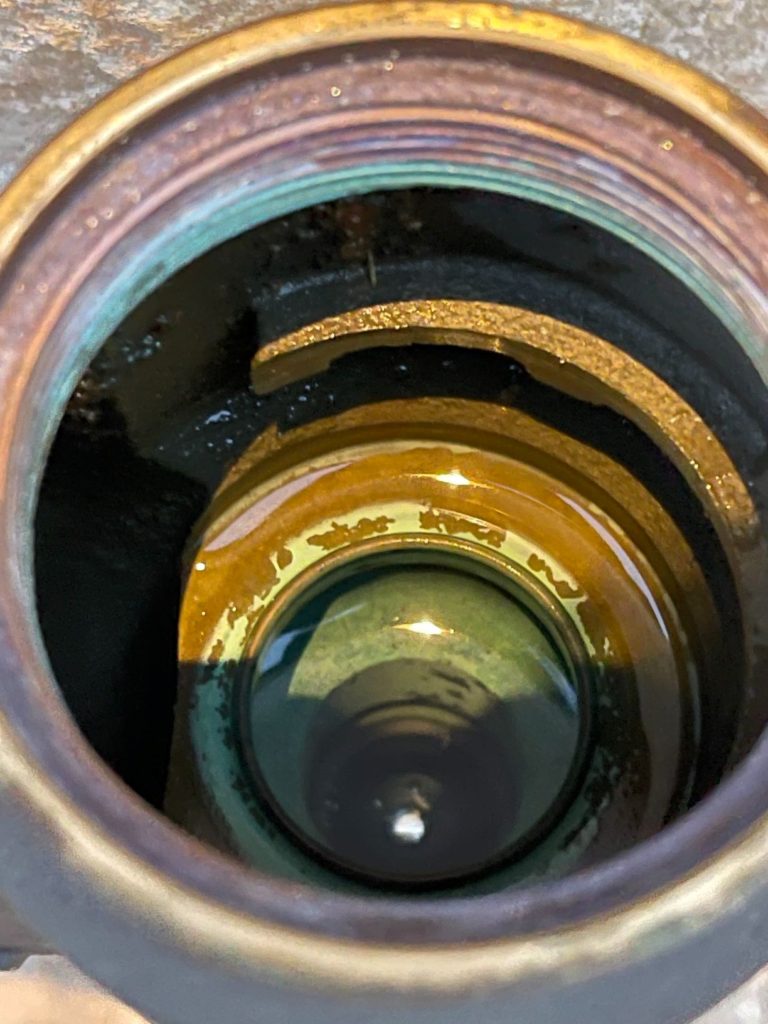
Dissemble the top of the PVD by hand and suck out the water using a Shop-Vac or other wet/dry vacuum. Just unscrew the nut on the canopy by hand in the diagram above and pull out the internal plastic pieces. It is very easy to take apart by hand using no tools. Here’s how it looks open after you pull the plastic pieces out of it. At this point, you have direct access to the water from the supply that is sitting at the bottom of the supply pipe. You can see a column of water is just sitting in there waiting to freeze and cause issues for you:
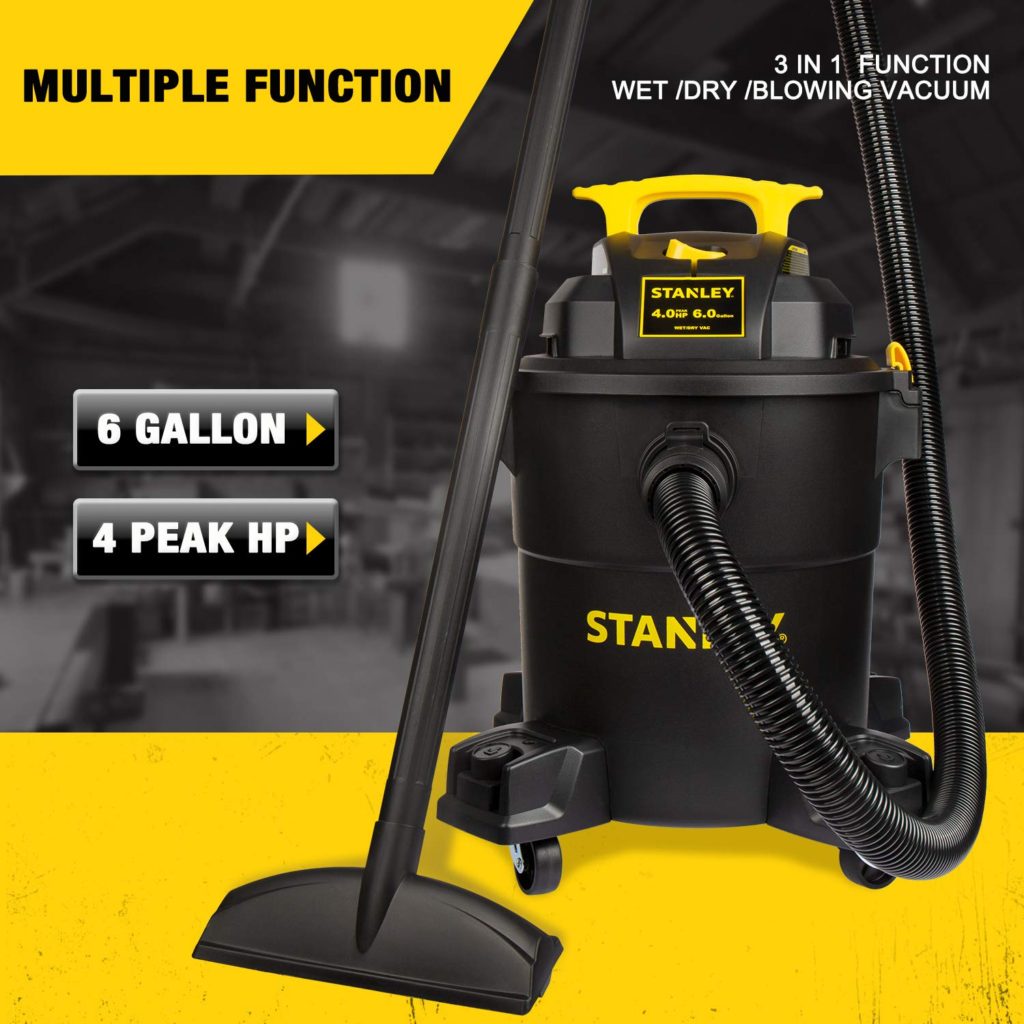
Now take a ShopVac or any other brand wet/dry vacuum and suck up as much water as you can out of the pipe. You may not have enough power to get it all out but as much as you can to drop the water level will prevent the pipe from breaking. The plastic PVC pipes have less chance of freeze cracking them than the metal brass parts above it so do whatever you can to drop the water level. If you don’t have a wet/dry vacuum you should buy one because they are extremely useful to pickup water like when your AC drain pan or other areas of your house leak. An inexpensive one is the Stanley SL18116P Wet/Dry Vacuum which can has a good 4 horsepower motor to suck the water out. Just take the stick part off and put the vacuum hose right against the top of the PVB to get the water out:
If you do this step then you can just cover up the top of the PVB with a bag or waterproof cover. This will make sure no water or ice gets in but it is still open with no pressure or water so there is nothing to expand or freeze. Any trapped water can evaporate easily since the top is not air-tight anymore. You can bring all the plastic pieces that are prone to breaking inside your house and put them back in after the freeze is over.
STEP 4 – insulation does not help but… #
Insulated waterproof cover. Again any insulation you use for a hard freeze around your pipes and PVB is useless in hard freeze condition. But using a cover will help create a small barrier of air around the outside of the pipes as well as prevent rainwater or melted ice during the day from turning into frozen ice directly on the pipes at night. It is really needed for step 5 where you add heat to ensure water does not turn into ice inside the pipes and PVB. If your PVB is on the north side of the house and doesn’t get much sunlight you will have a hard time keeping it warm with all the wind it’s going to be barraged with and the cover does help with that.
First, insulate the pipes and the PVB both. Most people forget to insulate the brass parts of the valves thinking they won’t break but those will break first in a hard freeze before the plastic pipes do. Watch this video that will show you how to wrap and tape properly. Don’t use regular duct tape because it will fall apart over time. Use outdoor-rated black tape on the insulation which will not deteriorate and also attract sunlight and hold in the heat:
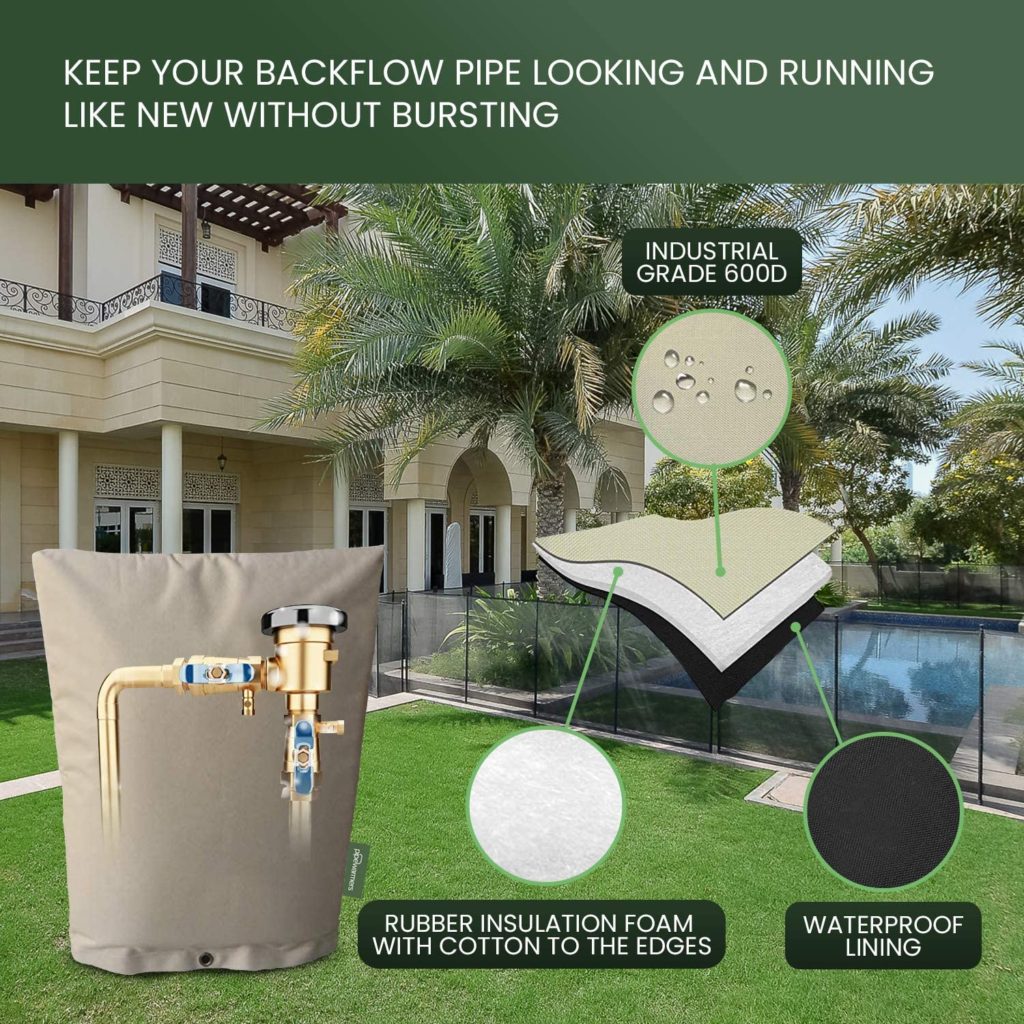
Second, doing this wrapping alone is completely useless in Texas with a hard freeze. If you do only this and stop you just wasted money. You need to put an insulated water-resistant pipe warmer bag like this for your PVB and above-ground pipes too. When you get to step 5 this is the key piece to ensure heat that you add stays inside the bag around your PVB and above-ground pipes:
You can also add these insulated water proof covers for your hose bibs (hose faucets) on the side of your house. It’s more to cover the holes into your house coming from the brick that is important with these as that’s where the water sits inside the pipe and can expand to break your pipe:

STEP 5 – adding heat to your PVB #
Add heat. That’s the only way to prevent water from turning to ice. You must do it safely so it’s not recommended if you are not certain you can pull this off without electrocuting yourself.
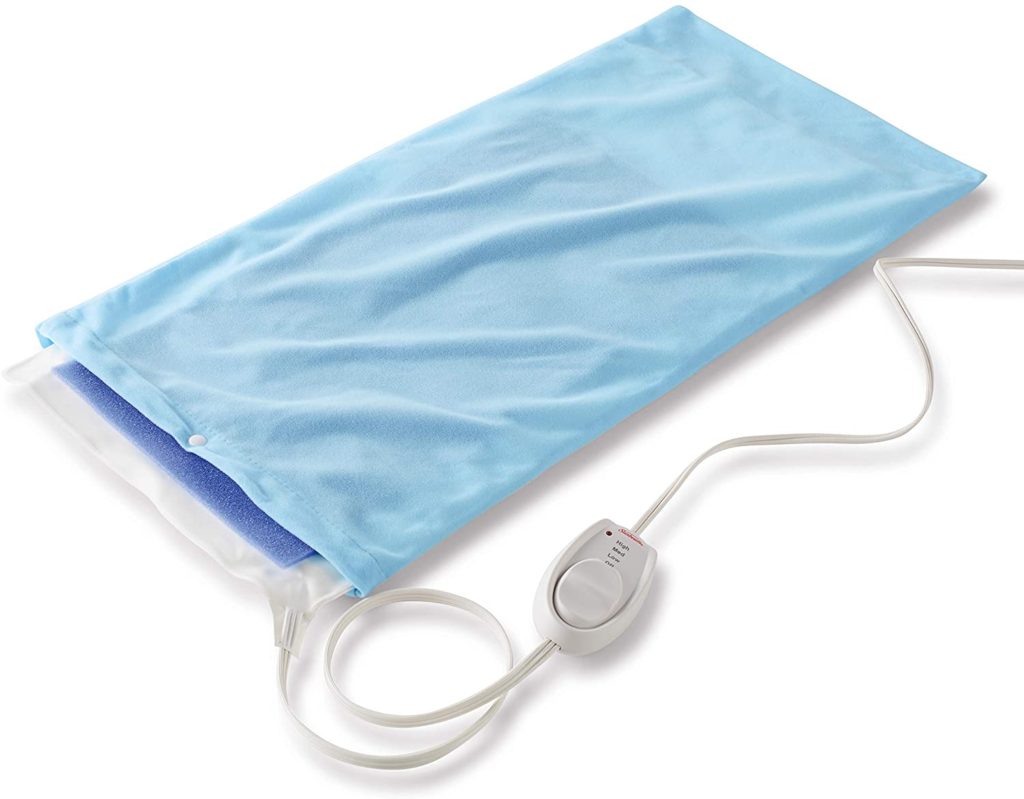
You can take an outdoor extension cord like you use for Christmas lights and put a heating pad underneath your coverings over the PVB to add heat. This will keep any little bits of water warm and prevent freezing. Use a heating pad that will stay on without an automatic shutoff timer like the Sunbeam XL King Size UltraHeat Heating Pad which is what I use for this purpose. This is one of the very few available heating pad models that come without an auto-shutoff timer and will stay on at the heat level you set until you manually turn it off. It is also very long and can wrap fully around the PVB and lower valve sections that are prone to breaking meaning good heat around the whole section from all sides. Click the picture for details:
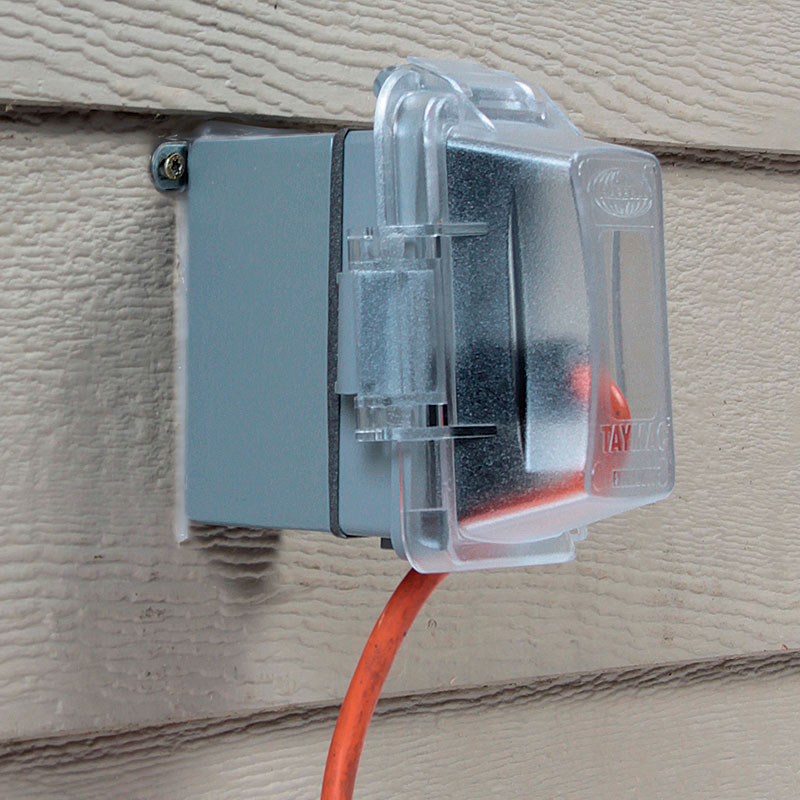
Find a GFCI outlet on the side of your house. All outdoor outlets should be GFCI per code and will have covers for the extension cord pass-through at the bottom to prevent water from going in:
DO NOT use a regular outlet inside your house or you can potentially kill yourself. Plug in an outdoor-rated extension cord like you use for your Christmas lights. Get a good long one that can make it from your GFCI outlet to the PVB. Click the picture below and you can select green or orange:
Make sure you put the heating pad under the waterproof insulated cover and the bottom is fully sealed so no water can soak up from the bottom as ice and snow melts. You don’t want the heating pad getting wet and causing the GFCI breaker to trip.
When it is time to remove the heating pad, go to your garage and turn off the breaker to the GFCI outlet. This ensures there is no power at the heating pad in case something gets exposed to water as you remove it. DO NOT risk electrocuting yourself.
My sprinkler PVB still broke, now what? #
Don’t worry you didn’t do anything wrong so don’t beat yourself up. That’s expected, unfortunately. As you have read by now Texas sprinkler systems are designed to fail in a hard freeze situation. It’s a cost-cutting measure by home builders who never thought hard freezes as severe as the February 2021 winter storms could ever happen in Texas. If yours survived you are very lucky.
Remember what you learned above that the PVB really has 2 sections inside that control water, a top section of plastic pieces and a bottom section of plastic pieces that are designed to break first before the metal brass pieces surrounding them break:
When you pull out the plastic pieces you can see it’s like putting together a children’s toy because all the pieces fit together:
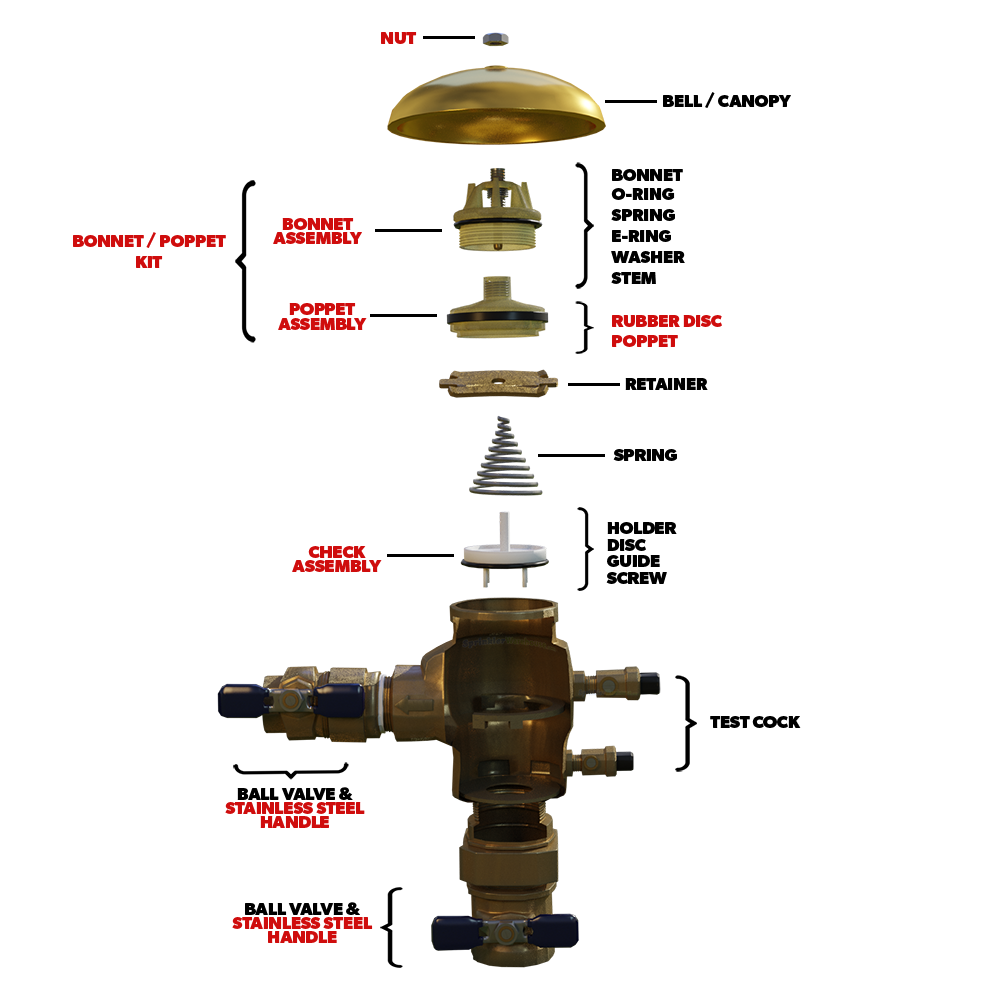
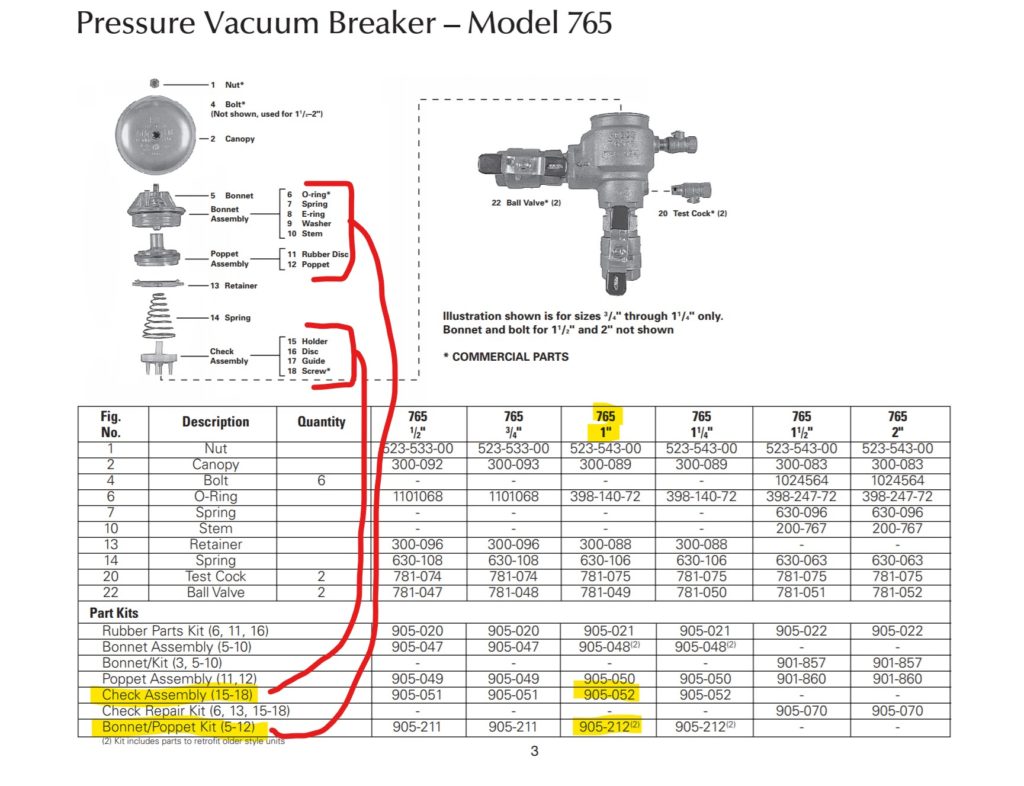
PVB manufacturers have their model and size on the PVB itself. Most common are 1″ models from Febco, Watts, Allen, Wilkins, Zurn, etc. Google for the manual. Inside the manual will the repair part numbers for the plastic pieces and rubber gaskets inside the PVB. Here is an example from the popular Febco 765-1 that many homeowners have. You can see the repair kits are packaged into the 2 sections that most often fail during a hard freeze which are the bonnet/poppet portion or the check assembly portion:
If the damage is to the brass then the entire PVB has to be replaced and you will want to call a sprinkler repair person, landscaper, or plumber to replace it. It will cost $200+ for the PVB and labor. Usually, a landscaper or sprinkler repair person is going to be cheaper than a plumber and you may be able to get it done around $150 with labor included if they can get the PVB at wholesale prices.
If you are lucky and it’s just the inside parts you can do it yourself using the part numbers from the manual. In the example above the bonnet/poppet and check assembly sections so you will need to look over your own manual and identify which repair kit you need to buy. The manuals have the most common parts that break as pre-packaged “repair kits” like this. You just buy the top or bottom repair kits and they often run about $25-$45 each for these repair kits. Sometimes the prices are higher online due to price gouging after a major freeze event so shop around if you can.
Bottom pieces – check valve assembly repair kit #
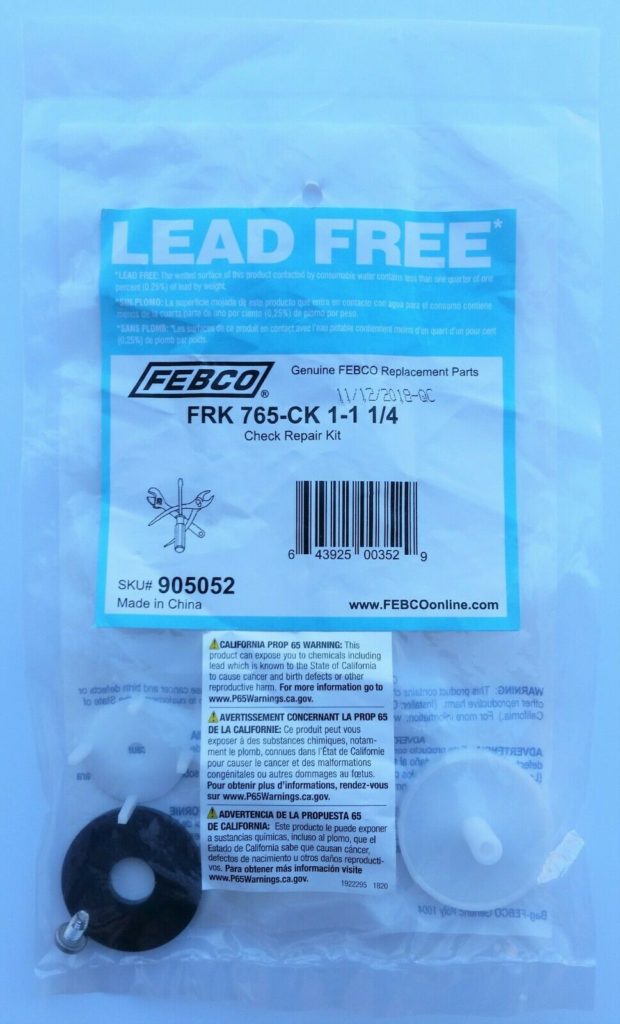
Here is an example of how you will receive the pre-packaged repair kit for a Febco 905-052 check valve assembly. Usually if water is leaking out of the bottom portion of your PVB this is likely what needs to be replaced. You will need to open your PVB and check to make sure. Click the picture below for details:
Top pieces – bonnet and poppet repair kit #
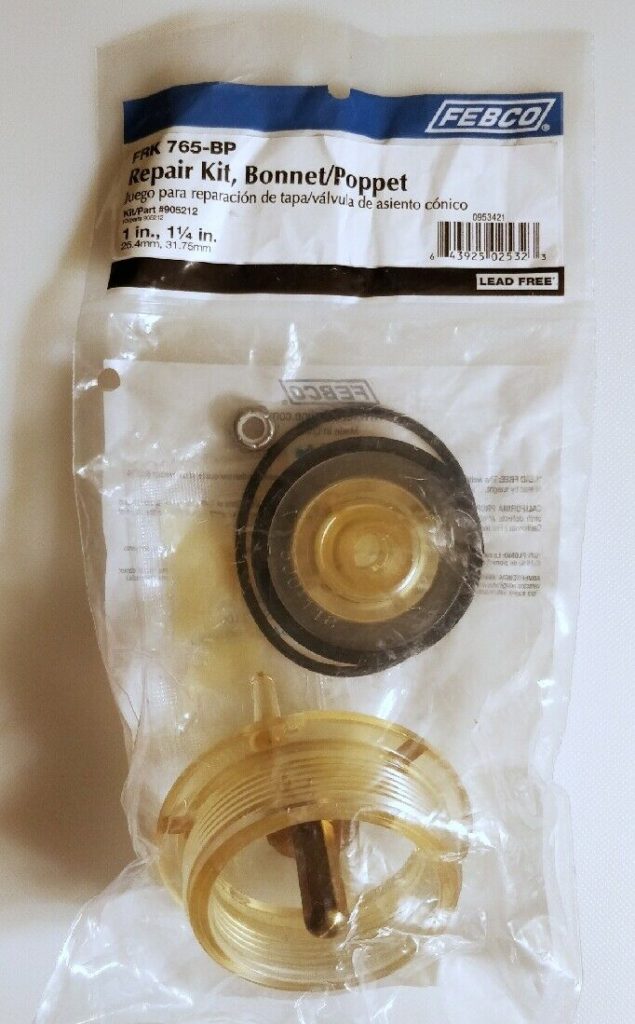
Here is an example of the pre-packaged Febco 905-212 bonnet and poppet repair kit. Usually when the top of your PVB is shooting water out this is what you will need to replace. Open up your PVB and make sure before buying. Click the picture below for details:
Fixing the PVB with these parts easily #
To take apart and drop in these replacement parts is extremely easy and can be done by hand with no tools. Here is a YouTube video showing the process on a Febco 765-1 PVB but pretty much all manufacturers are done the same way:
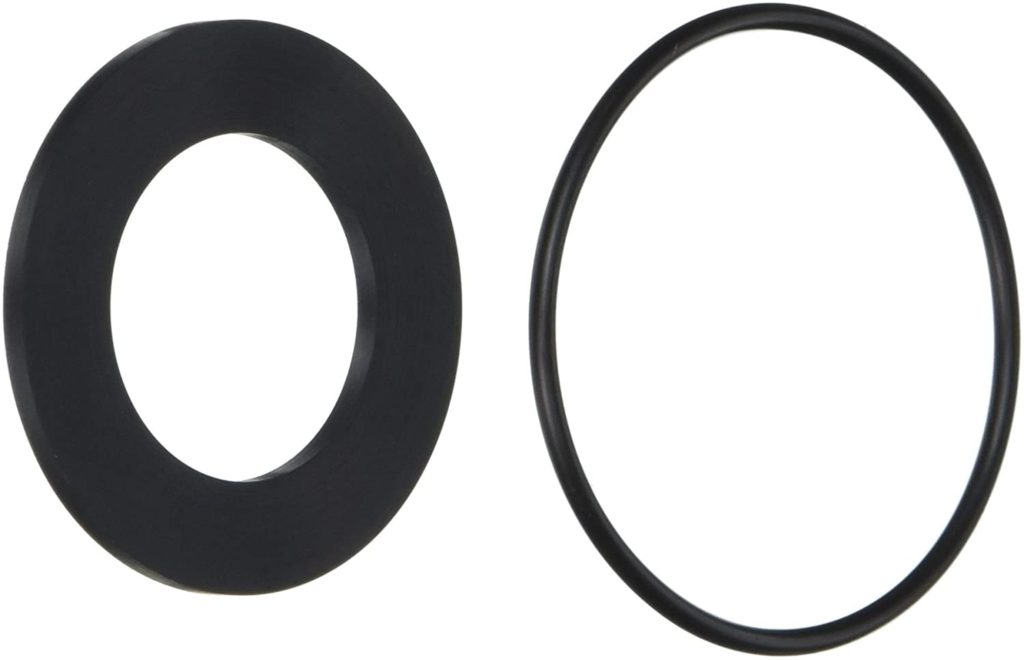
The plastic pieces look good but the soft rubber gaskets are warped and ripped #
Count yourself lucky because the gaskets are very cheap to replace. If it’s just a minor drip and you open up the PVB you can confirm it’s just a gasket issue that’s preventing the PVB plastic pieces from sealing properly. You can buy a third party PVB gasket repair kit for very cheap. Click the picture below for details:
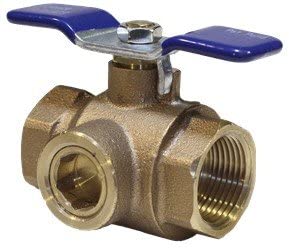
The brass valve were the water supply comes in cracked #
Not great but it is still a cheaper fix than replacing the whole PVB body. Usually the brass valve at the water supply will crack if there is a column of water trapped in it. You can buy just the 1″ brass shutoff valve and replace it. It will require a sprinkler repair person, landscaper, or plumber to get replaced. Click the picture below for details.

If you don’t mind paying a little extra, get a Freeze Tolerant Shutoff Ball Valve. These are really nice because the port on the side has a freeze plug in it which is designed to crack and be replaced inexpensively yourself. The freeze plug is thin-walled versus the rest of the valve body and will burst below freezing when the water turns to ice and expands. The valve itself has a lifetime warranty guaranteed to never crack for this reason. This is how it looks, click the picture for details:
Here are the Freeze Tolerant replacement freeze plugs if one bursts from a freeze event. As you can see this is much less expensive: to replace these, click the photo for details:

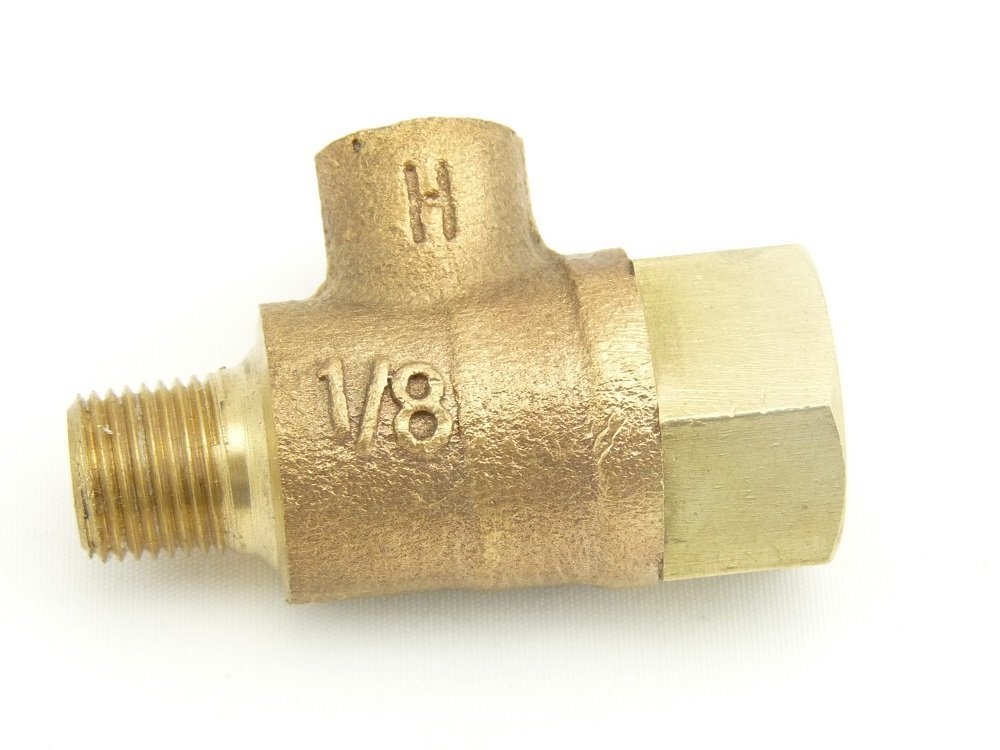
The bleeder valve test cock port is slowly leaking water #
If the test cock (bleeder valve) on the sides are slowly leaking water this means you may have drained the PVB but closed the little slot valve instead of leaving it at a 45-degree angle halfway open to let water evaporate. This caused water at the valve to get trapped and expand which messed up the tiny ball valve inside. Now when you turn the water on a little bit of water keeps dripping out of the test cock even though you have closed it. Usually, it’s the bottom test cock port this happens on where there is a high chance of water getting trapped. This is a very cheap and easy fix as well. You do not need to hire anyone to change this. Use the main valve at the bottom of the PVB to turn off the water supply. Then drain the test cock ports with a flat screwdriver to relieve pressure. Then just take a crescent wrench to unscrew the test cock. Then screw in the new one. They even come with the white plumber’s tape on the threads so you don’t have to do anything special, just screw the new one on. Takes all of 5 minutes to do.
Note that Febco and Watts are the same company now and the newer 765-1 use a different size test cock. Some models use 1/4″ test cocks and others use 1/8″ test cocks. Go check the side of your test cock where it will say which size it is to order the correct one.
1/4″ Febco test cock looks like this, click the photo for details:

1/8″ Febco test cock looks like this, click the photo for details:
Your existing test cocks may have the SAE adapter on one end which is used to quickly connect a pressure gauge hose for pressure tests that some parts of the US up north require you submit annually to your city. It is not necessary for Texas to have this adapter but you can buy a test cock with the SAE adapter end on it as well if you want to keep it matching your existing test cock, click the picture for details:

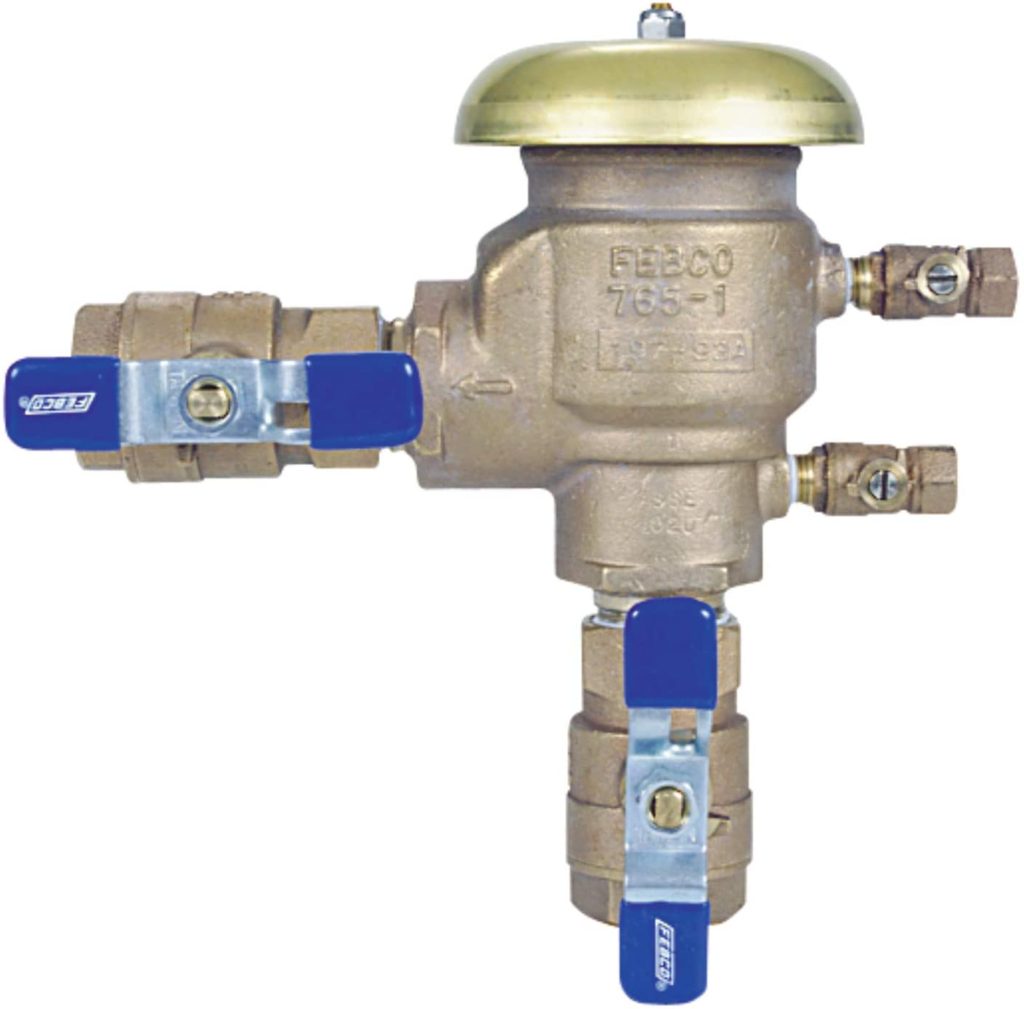
Replacing the whole PVB because the brass body cracked #
If the PVB has a crack in the brass because you didn’t drain it at all, you must replace the whole thing. This will cost $200+ with labor. It is not recommended you try it yourself because you will need plumbing tools to get it replaced. Especially if you are changing the manufacturer and model. You will want a professional sprinkler repair, landscaper, or plumber to swap it out. Here is an example of the popular Febco 765-1 PVB replacement and it comes with all the plastic pieces inside so you don’t need to change out anything else. If you can buy it yourself and have someone do the labor to replace it may be cheaper for you, click the picture for details:
The water shutoff valve handles are rusted and hard to turn #
This isn’t a leaking issue but can become a problem when you want to shut off the water the next time a freeze is about to happen. You can spray PB Blaster or WD-40 to loosen it. You may have to use a rubber mallet to gently tap the valve to turn but hold your pipes steady because you can hit at the wrong angle and break your pipes. Luckily it is easy to replace just the valve handle yourself and you can buy replacement valve handles. Click the photo for details for the handle that fits on a Febco 1″ PVB. This is very easy to replace yourself in minutes:


